 |
|||
|
|
|||
|
|
|||
| ||||||||||
|
|
 TB 9-2320-364-13&P-2
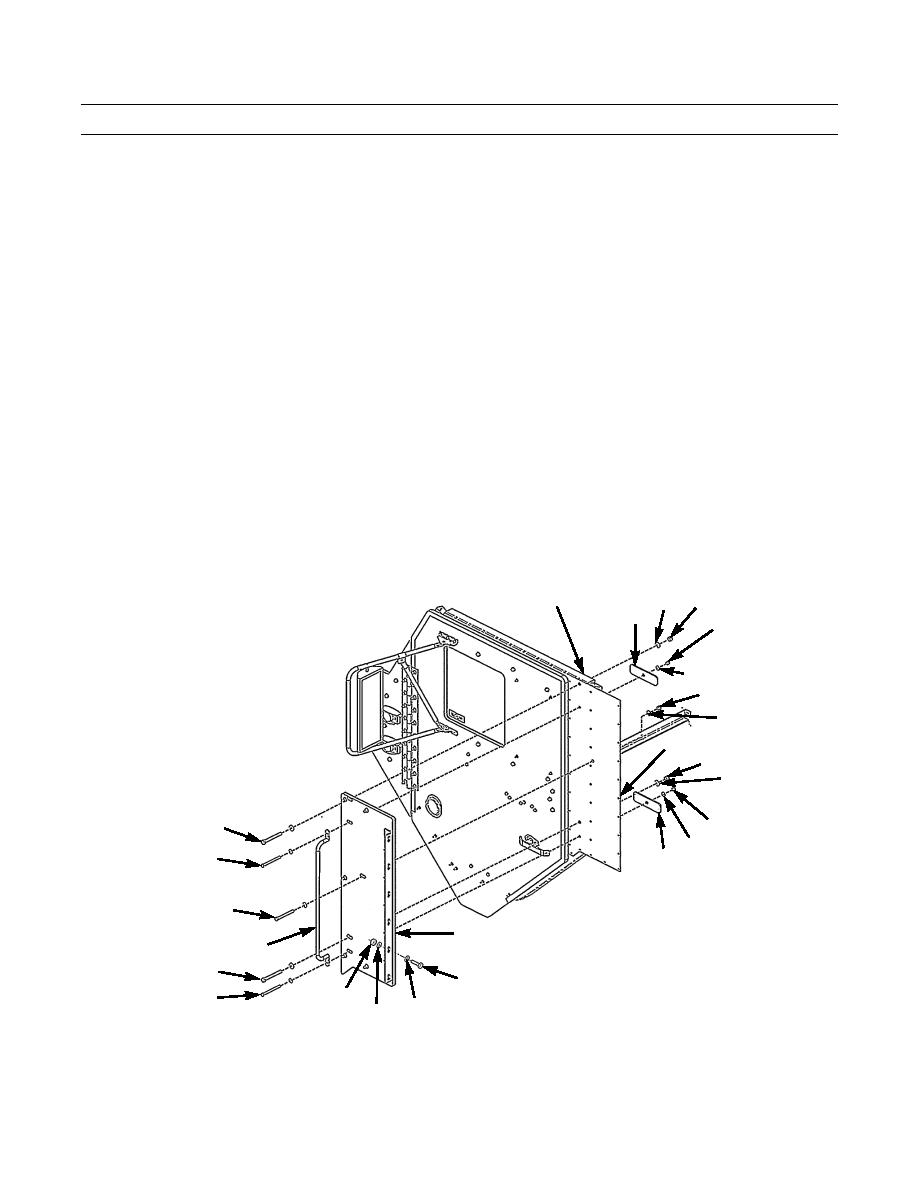
CAB SIDE (REAR) ARMOR REPLACEMENT - CONTINUED
0028 00
INSTALLATION - CONTINUED
2.
With assistance, install cab side (rear) armor (15), six washers (17), bolts (16), washers (18), and new locknuts (19) on
side of cab. Hand tighten locknuts
NOTE
Seat belt brackets in this procedure only apply to vehicles with 3-point seat belts.
3.
Install washer (30), bolt (29), seat belt bracket (1), washer (3), and new locknut (4) in cab side (rear) armor (15). Hand
tighten locknut.
4.
Install washer (23), bolt (22), seat belt bracket (9), washer (11) and new locknut (10) in cab side (rear) armor (15). Hand
tighten locknut.
5.
Install washer (26), bolt (25), washer (8) and new locknut (7) in cab side (rear) armor (15). Hand tighten locknut.
6.
Install handle (24), washer (28), bolt (27), attachment plate (2), washer (6), and new locknut (5). Hand tighten locknut.
7.
Install washer (21), bolt (20), attachment plate (14), washer (13), and new locknut (12). Hand tighten locknut.
8.
Close cab door and measure gap between rear edge of door and front edge of cab side (rear) armor (15). Gap should be
between 1/8 in. (3.2 mm) and 3/8 in. (9.5 mm). Adjust position of cab side (rear) armor as necessary.
9.
Tighten locknuts to 35 ft-lb (47.5 Nm).
1 (HIDDEN)
3
4
2
5
6
7
8
9 (HIDDEN)
10
11
29,30
12
13
27,28
14
25,26
15
24
22,23
16
19
20,21
17
18
417-051
END OF WORK PACKAGE
0028 00-4
|
|
Privacy Statement - Press Release - Copyright Information. - Contact Us |
