|
| |
TM 9-2320-364-20-4
12-92
Materials/Parts
Cloth, Cleaning (Item 31, Appendix C)
Tags, Identification (Item 88, Appendix C)
This task covers:
a. Disassembly
c. Assembly
b. Cleaning/Inspection
d. Follow-On Maintenance
INITIAL SETUP
Equipment Condition
After cooler removed, (Para 12-20)
Tools and Special Tools
Tool Kit, General Mechanics: Automotive
(Item 74, Appendix G)
Socket Set, 3/8 in. (Item 62, Appendix G)
Wrench, Combination 1-1/2 in.
(Item 83, Appendix G)
Wrench, Torque (0 to 60 N.m)
(Item 98, Appendix G)
12-22. AFTER COOLER REPAIR.
Materials/Parts - Continued
Locknut (12) (Item 111, Appendix F)
Preformed Packing Kit (Item 288, Appendix F)
a.
Disassembly.
NOTE
After cooler and air dryers
look alike.
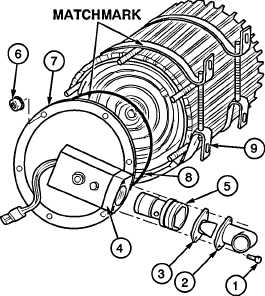
Matchmark lower cover and
housing.
(1)
Remove three screws (1), elbow (2) and dust
boot (3) from heater housing (4).
NOTE
A 15/16 inch OD nut in purge
valve may be used to turn purge
valve counterclockwise to
remove.
(2)
Remove purge valve assembly (5) from
heater housing (4).
(3)
Remove six locknuts (6) from lower
cover (7). Discard locknuts.
(4)
Remove lower cover (7) and preformed
packing (8) from housing (9). Discard
preformed packing.
|