|
| |
TM 9-2320-364-20-4
12-131
b.
Cleaning/Inspection.
(1)
Clean sealant from pipe threads.
(2)
Inspect drain cable for frayed or broken wires.
(3)
Inspect threads, fittings and tank for cracks, broken welds and stripped threads.
(4)
Replace all damaged parts.
c.
Installation.
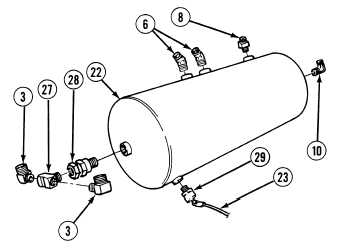
(1)
Install air reservoir (22) in soft jawed vise.
Adhesives, solvents, and sealing compounds can burn easily, can give off harmful vapors, and
are harmful to skin and clothing. To avoid injury or death, keep away from open fire and use
in well-ventilated area. If adhesive, solvent, or sealing compound gets on skin or clothing,
wash immediately with soap and water.
NOTE
Install elbows, tees and fittings as noted prior to removal.
(2)
Apply sealing compound to threads of drain
valve (29).
NOTE
Perform Step (3) if drain valve
cable was removed.
(3)
Cut new drain cable (23) to 30 in. (76 cm)
and crimp on drain valve (24).
(4)
Install drain valve (29) on air reservoir (22).
(5)
Apply sealing compound to threads of
elbow (10).
(6)
Install elbow (10) in air reservoir (22).
(7)
Apply sealing compound to threads of elbow (8).
(8)
Install elbow (8) in air reservoir (22).
(9)
Apply sealing compound to threads of two elbows (6).
(10)
Install two elbows (6) in air reservoir (22).
(11)
Apply sealing compound to threads of check valve (28).
(12)
Install check valve (28) in air reservoir (22).
(13)
Apply sealing compound to threads of tee (27).
(14)
Install tee (27) on check valve (28).
(15)
Apply sealing compound to threads of two elbows (3).
(16)
Install two elbows (3) in tee (27).
(17)
Remove air reservoir (22) from vise.
|