|
| |
TM 9-2320-364-20-4
12-150
This task covers:
a. Removal
b. Installation
c. Follow-On Maintenance
INITIAL SETUP
Equipment Condition
Engine OFF, (TM 9-2320-364-10)
Wheels chocked, (TM 9-2320-364-10)
Gladhands removed, (Para 12-43)
Front double check valves removed, (Para 12-11)
Tools and Special Tools
Tool Kit, General Mechanic’s: Automotive
(Item 74, Appendix G)
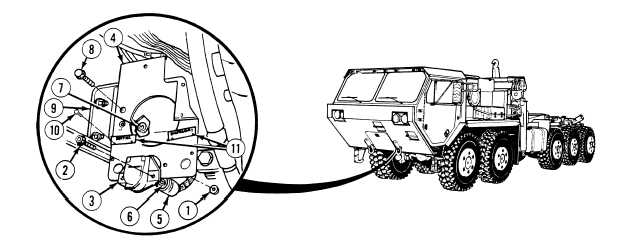
12-32. FRONT GLADHAND BRACKET REPLACEMENT.
Materials/Parts
Tags, Identification (Item 88, Appendix C)
Locknut (4) (Item 107, Appendix F)
Locknut (2) (Item 133, Appendix F)
a.
Removal.
(1)
Remove two locknuts (1) and screws (2) from connector (3) and front gladhand bracket (4). Discard
locknuts.
(2)
Slide back rubber boot (5) and remove connector wires (6) from slot in front gladhand bracket (4).
NOTE
If truck is equipped with an arctic kit, mark installed position of arctic pump bracket before
performing Step (3).
(3)
Remove four locknuts (7), screws (8) and front gladhand bracket (4) from front crossmember (9). Discard
locknuts.
NOTE
Perform Step (4) if name plates are damaged.
(4)
Remove four drive screws (10) and two nameplates (11) from front gladhand bracket (4). Discard drive
screws.
|