|
| |
TM 9-2320-364-20-4
7-22
7-5. ALTERNATOR BELTS REPLACEMENT/ADJUSTMENT (200 AMP) (CONT).
Adhesive causes immediate
bonding on contact with eyes,
skin, or clothing and also gives
off harmful vapors. Wear
protective goggles and use in
well-ventilated area. If adhesive
gets in eyes, try to keep eyes
open; flush eyes with water for
15 minutes and get immediate
medical attention.
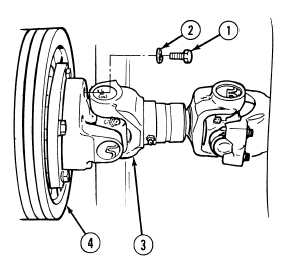
(7)
Coat threads of four screws (1) with sealing
compound.
(8)
Install pump drive shaft assembly (3) on
engine (4) with four lockwashers (2) and
screws (1). Tighten screws to 60 lb-ft (81
N.m).
c.
Adjustment.
NOTE
If adjusting only, perform Steps
(2) through (6) of a. Removal
and Steps (2) through (6) of b.
Installation.
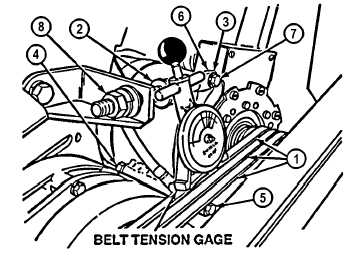
(1)
Install belt tension gage on one belt (1).
(2)
Tighten nut (2) on alternator support arm (3)
until alternator belt tension reaches 60 to 65
lbs (260-289 N). Check tension on other
two belts.
(3)
Tighten nut (4) on screw (5) to 90 lb-ft (122
N.m).
(4)
Tighten locknut (6) on screw (7) to 26 to 30
lb-ft (30 to 41 N.m).
(5)
Tighten nut (8) on alternator support arm
(3).
(6)
Remove belt tension gage from alternator
belt (1).
|