|
| |
TM 9-2320-364-20-4
7-243
Ensure engine is cool before performing this task or injury to personnel may result.
NOTE
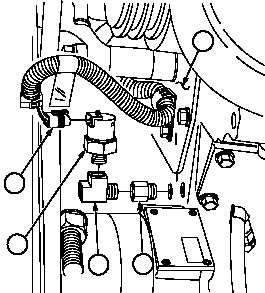
Connectors are removed by gently prying on tab and pulling apart connectors.
(2)
Disconnect connector (6).
(3)
Remove DDEC engine oil pressure sensor (7) from tee (8).
(4)
Remove tee (8) from reducer (9).
(5)
Remove reducer (9) from engine (10).
b.
Installation.
Adhesives, solvents, and sealing
compounds can burn easily, can give
off harmful vapors, and are harmful
to skin and clothing. To avoid injury
or death, keep away from open fire
and use in a well-ventilated area. If
adhesive, solvent, or sealing
compound gets on skin or clothing,
wash immediately with soap and
water.
(1)
Apply sealing compound to threads of
DDEC engine oil pressure sensor (7), tee (8)
and reducer (9).
(2)
Install reducer (9) in engine (10).
(3)
Install tee (8) in reducer (9).
(4)
Install DDEC engine oil pressure sensor (7)
on tee (8).
(5)
Connect connector (6).
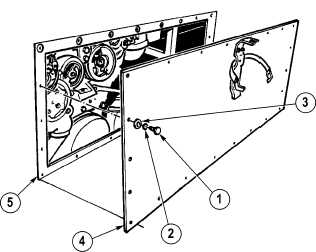
(6)
Install cab engine access panel (4) in cab (5)
with 22 washers (3), lockwashers (2) and
screws (1).
c.
Follow-On Maintenance:
Install fire extinguisher, (TM 9-2320-364-10).
Connect batteries, (Para 7-87).
Remove wheel chocks, (TM 9-2320-364-10).
END OF TASK
6
7
8
9
10
|