|
| |
TM 9-2320-364-20-5
15-38
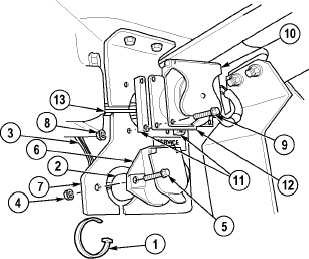
15-14. SERVICE GLADHAND BRACKET REPLACEMENT (CONT).
(6)
Remove locknut (14), cushion clip (15) and
screw (16) from bracket (7). Discard
locknut.
NOTE
Perform Step (7) if name plate is
damaged.
(7)
Remove two drive screws (17) and
nameplate (18) from bracket (7).
(8)
With the aid of an assistant, remove two
locknuts (19), screws (20) and bracket (7)
from rear crossmember (21). Discard
locknuts.
b.
Installation.
(1)
With the aid of an assistant, install
bracket (7) on rear crossmember (21) with
two screws (20) and locknuts (19).
NOTE
Perform Step (2) if name plate
was removed.
(2)
Install nameplate (18) on bracket (7) with
two drive screws (17).
(3)
Install cushion clip (15) on rear of
bracket (7) with screw (16) and locknut (14).
(4)
Guide wires (13) on MC15 connector (12)
through slot on side of bracket (7).
(5)
Install two spacers (11), MC15 connector
(12) and connector cover (10) on bracket (7)
with four screws (9) and locknuts (8).
(6)
Guide wires (3) on MC16 connector (6)
through slot on bottom of bracket (7).
(7)
Install MC16 connector (6) on bracket (7)
with two screws (5) and locknuts (4).
|