|
| |
TM 9-2320-364-20-5
17-131
(3)
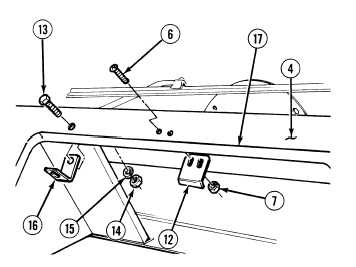
Remove four screws (6), locknuts (7) and
glove box door (8) from dash (4). Discard
locknuts.
(4)
Remove two screws (9), tenz nuts (10) and
bracket (11) from glove box door (8).
Discard tenz nuts.
(5)
Remove two screws (6), locknuts (7) and
striker (12) from dash (4). Discard locknuts.
(6)
Remove screw (13), nut (14), lockwasher
(15) and bracket (16) from dash (4). Discard
lockwasher.
(7)
Remove gasket strip (17) from dash (4).
Discard gasket strip.
b.
Installation.
Adhesives, sovents, and sealing
compounds can burn easily, can
give off harmful vapors, and are
harmful to skin and clothing. To
avoid injury or death, keep away
from open fire and use in a well-
ventilated area. If adhesive,
solvent, or sealing compound gets
on skin or clothing, wash
immediately with soap and water.
(1)
Apply adhesive to back of gasket strip (17).
NOTE
Use glove box door as a template
to install and trim corners of
gasket strip.
(2)
Install gasket strip (17) on dash (4).
(3)
Install bracket (16), screws (13), lockwasher
(15) and nut (14) in dash (4).
(4)
Install striker (12), two screws (6) and
locknuts (7) in dash (4).
|