|
| |
TM 9-2320-364-20-5
20-35
(3)
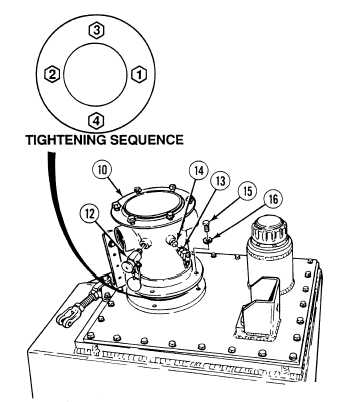
Install four lockwashers (16) and screws (15)
to filter housing (10) in sequence shown.
Torque screws to 75 to 85 lb-in (9-10 N.m).
(4)
Torque screw (15) in sequence shown to 100
to 110 lb-in (11-12 N.m).
(5)
Install preformed packing (14) and
coupling (13) on filter housing (10).
Adhesives, solvents, and sealing
compounds can burn easily, can
give off harmful vapors, and are
harmful to skin and clothing. To
avoid injury or death, keep away
from open fire and use in
well-ventilated area. If adhesive,
solvent, or sealing compound gets
on skin or clothing, wash
immediately with soap and water.
(6)
Apply sealing compound to threads of
bleeder valve (12). Install bleeder valve (12)
in filter housing (10).
(7)
Install preformed packing (11) and
adapter (6) in filter housing (10).
(8)
Install preformed packing (9) and reducer (8)
in filter housing (10).
(9)
Install elbow (3) and preformed packing (7)
on reducer (8).
(10)
Install preformed packing (5) and hose
2918 (4) on adapter (6).
(11)
Install preformed packing (2) and hose
2773 (1) on elbow (3).
d.
Follow-On Maintenance:
Install main hydraulic filter, (Para 20-9).
Remove wheel chocks, (TM 9-2320-364-10).
END OF TASK
|