|
| |
TM 9-2320-364-34-2
3-53
Adhesives, solvents, and sealing compounds can burn easily, can give off harmful vapors, and
are harmful to skin and clothing. To avoid injury or death, keep away from open fire and use
in well-ventilated area. If adhesive, solvent, or sealing compound gets on skin or clothing,
wash immediately with soap and water.
Ensure nut on crankshaft is turned in clockwise direction only. Turning nut on crankshaft in
counterclockwise direction may cause damage to parts.
NOTE
If 12 screws do not align in Steps (4) through (7), perform Steps (8) and (9) and repeat
Steps (4) through (7).
Screws must be turned in as far as possible by hand to prevent binding with flexplate
housing.
(4)
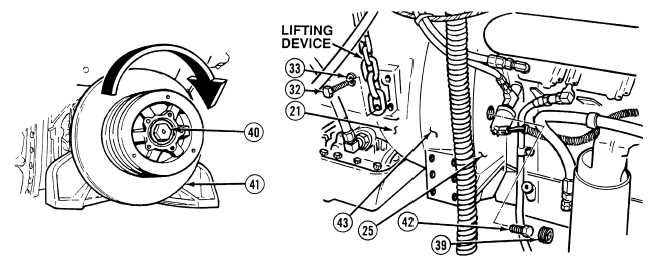
With the aid of an assistant, turn nut (40) on crankshaft (41) to access screws (42), apply coat of sealing
compound to 12 screws (42) and position screws through flexplate housing (43).
(5)
Tighten 12 screws (42) to 80 to 90 lb-ft (108 to 122 N.m).
(6)
Apply sealing compound to plug (39) and install in right side of engine (25).
(7)
Remove two screws (32), lockwashers (33) and lifting device from transmission (21). Discard lockwashers.
|