|
| |
TM 9-2320-364-34-2
5-7
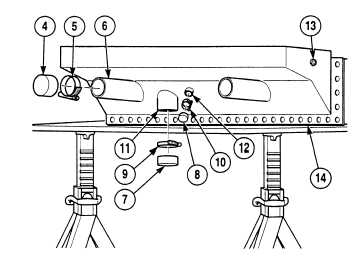
(2)
Install two plugs (4) and clamps (5) in
radiator inlet necks (6).
(3)
Install plugs (7) and (8) and clamps (9)
and (10) in shunt line (11) and deaeration
line (12).
Adhesives, solvents, and sealing
compounds can burn easily, can
give off harmful vapors, and are
harmful to skin and clothing. To
avoid injury or death, keep away
from open fire and use in well-
ventilated area. If adhesive,
solvent, or sealing compound
gets on skin or clothing, wash
immediately with soap and water.
(4)
Coat threads of sight glass (13) with sealing
compound.
(5)
Install sight glass (13) in radiator
assembly (14).
(6)
Fill radiator assembly (14) with water.
(7)
Install adapter on radiator assembly (14).
(8)
Install radiator tester on adapter.
(9)
Using tester, pressurize radiator
assembly (14) to 10 psi (69 kPa).
NOTE
If radiator leaks or loss of
pressure is noted, replace the
radiator.
(10)
Observe radiator assembly (14) for water
leaks and loss of pressure on tester.
Use extreme care when removing
tester. Sudden release of
pressure can cause injury to
personnel.
(11)
Slowly remove tester and adapter from
radiator assembly (14).
|