|
| |
TM 9-2320-364-34-2
7-14
7-9. TRANSMISSION YOKE/DUST SHIELD/OIL SEAL REPLACEMENT (CONT).
b.
Installation.
(1)
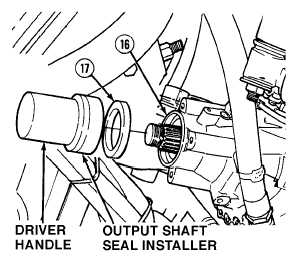
Coat sealing lip of oil seal (17) with high
temperature grease.
NOTE
Install oil seal until oil seal
installer lip contacts rear cover.
(2)
Using driver handle and output shaft seal
installer, install oil seal (17) lip first, in rear
cover (16).
Adhesives, solvents, and sealing
compounds can burn easily, can
give off harmful vapors, and are
harmful to skin and clothing. To
avoid injury or death, keep away
from open fire and use in well-
ventilated area. If adhesive,
solvent, or sealing compound
gets on skin or clothing, wash
immediately with soap and water.
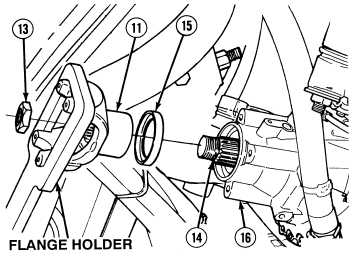
(3)
Coat outer surface of dust shield (15) with
adhesive (RTV 108).
NOTE
Install dust shield in rear
cover until rear edge of dust
shield is flush with surface of
rear cover.
Dust shield is installed in
rear cover flat side first.
(4)
Install dust shield (15) in rear cover (16).
(5)
Coat splines of output shaft (14) with
adhesive (RTV 732).
(6)
Position transmission yoke (11) on output
shaft (14).
(7)
With the aid of an assistant, use flange
holder to hold transmission yoke (11), install
locknut (13) on output shaft (14). Tighten
locknut to 700 lb-ft (949 N.m).
|