|
| |
TM 9-2320-364-34-2
9-3
Materials/Parts
Cable Ties (Item 9, Appendix B)
Oil, Lubricating (Item 36, Appendix B)
Sealing Compound (Item 56, Appendix B)
Tags, Identification (Item 72, Appendix B)
Locknut (2) (Item 166, Appendix E)
Locknut (Item 181, Appendix E)
Locknut (2) (Item 182, Appendix E)
Locknut (4) (Item 188, Appendix E)
Pin, Cotter (Item 421, Appendix E)
This task covers:
a. Removal
b. Installation
c. Follow-On Maintenance
INITIAL SETUP
Personnel Required
Two
Equipment Condition
Engine OFF, (TM 9-2320-364-10)
Wheels chocked, (TM 9-2320-364-10)
Wheels/tires removed, (TM 9-2320-364-10)
Shock absorbers removed, (TM 9-2320-364-20)
Axle oil drained, (TM 9-2320-364-20)
Tools and Special Tools
Tool Kit, General Mechanic’s
(Item 240, Appendix F)
Hammer, Hand, Soft Plastic
(Item 88, Appendix F)
Jack, Kit, Hydraulic, Hand
(Item 129, Appendix F)
Jack, Transmission (Item 131, Appendix F)
Protractor, Square (Item 171, Appendix F)
Wrench, Combination, 1-1/4 in.
(Item 256, Appendix F)
Wrench Set, Socket 3/4 in. Drive
(Item 274, Appendix F)
Wrench, Torque (0-175 lb-ft [0-237 N.m])
(Item 277, Appendix F)
Wrench, Torque (0-600 lb-ft [0-814 N.m])
(Item 278, Appendix F)
Steel Plate (Appendix C)
Wooden Block (Appendix C)
9-3. AXLE NO. 1 ASSEMBLY REPLACEMENT.
a.
Removal.
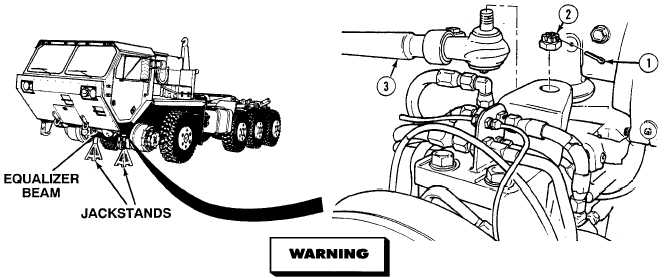
Axle No. 1 weighs 1,950 lbs (885 kg). Use jackstands to support axles. Failure to do so
could result in injury to personnel.
(1)
Position jackstands under axle No. 1 end of equalizer beams.
(2)
Remove cotter pin (1) from castle nut (2). Discard cotter pin.
(3)
Remove castle nut (2) from drag link (3).
|