|
| |
TM 9-2320-364-34-3
16-42
16-3. BOOM ASSEMBLY REPAIR (CONT).
Adhesives, solvents, and sealing
compounds can burn easily, can
give off harmful vapors, and are
harmful to skin and clothing. To
avoid injury or death, keep away
from open fire and use in a well-
ventilated area. If adhesive,
solvent, or sealing compound gets
on skin or clothing, wash
immediately with soap and
water.
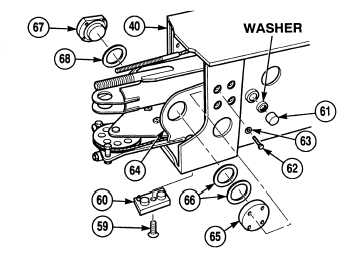
(78)
Apply sealing compound to threads of four
screws (62).
(79)
Install right trunnion plate (67) and
washer (68) in fly section (64) with four
washers (63) and screws (62). Tighten
screws to 25 lb-ft (34 N.m).
(80)
Apply sealing compound to threads of four
screws (62).
(81)
Install left trunnion plate (65) and two
washers (66) in fly section (64) with four
washers (63) and screws (62). Tighten
screws to 25 lb-ft (34 N.m).
NOTE
Install washers as noted during
removal.
(82)
Install washers and side wear pads (61) in
outer-mid section (40).
(83)
Apply grease to two wear pads (61).
NOTE
Wear pads are installed with
taper to outside.
(84)
Apply sealing compound to threads of two
screws (59).
(85)
Install two upper rear wear pads (60) on
outer-mid section (40) with two screws (59)
(86)
Apply grease to two wear pads (60).
|