|
| |
TM 9-2320-364-34-3
16-66
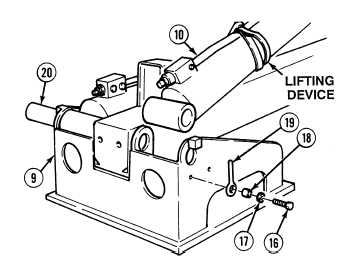
16-6. LIFT CYLINDER REPLACEMENT (CONT).
(9)
Remove two screws (16), washers (17),
bushings (18) and lock pins (19) from
pin (20) and turntable (9).
One pin secures both lift cylinders
and mast. Be careful to drive out
pin only as far as needed to
remove selected cylinder and
prevent possible injury to
personnel.
(10)
Drive pin (20) out far enough to remove lift
cylinder (10).
(11)
Remove lift cylinder (10) from turntable (9).
(12)
Place drain pan under lift cylinder (10) to catch excess fluid.
(13)
Remove lifting device and allow lift cylinder (10) to drain into drain pan.
(14)
Repeat Steps (1) through (13) for other lift cylinder.
b.
Installation.
Lift cylinder weighs 122 lbs (55 kg). Attach suitable lifting device prior to installation to
prevent possible injury to personnel.
Adhesives, solvents, and sealing compounds can burn easily, can give off harmful vapors,
and are harmful to skin and clothing. To avoid injury or death, keep away from open fire
and use in well-ventilated area. If adhesive, solvent, or sealing compound gets on skin or
clothing, wash immediately with soap and water.
NOTE
Left and right side lift cylinders are installed the same way. Left side shown.
(1)
Attach lifting device around lift cylinder (10).
(2)
With the aid of an assistant, align and position lift cylinder (10) in turntable (9).
(3)
Apply antiseize compound to pin (20).
(4)
Install lift cylinder (10) by driving pin (20) back through cylinder and turntable (9).
(5)
Apply sealing compound to threads of two screws (16).
(6)
Apply antiseize compound to two lock pins (19).
(7)
Install two lock pins (19) and bushings (18) with washers (17) and screws (16). Tighten screws to 135
lb-ft (183 N.m).
|