|
| |
TM 9-2320-364-34-4
20-63
This task covers:
a. Removal
b. Follow-On Maintenance
INITIAL SETUP
Equipment Condition
Engine oil filter and spin-on adapter housing
removed, (Para 20-23)
Tools and Special Tools
Tool Kit, General Mechanic’s
(Item 240, Appendix F)
Bit Set, Screwdriver (Item 17, Appendix F)
Pan, Drain 4 gal (Item 144, Appendix F)
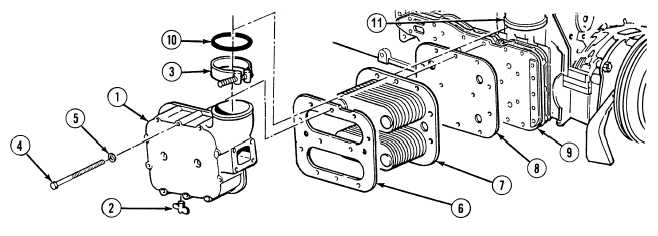
20-24. ENGINE OIL COOLER ASSEMBLY REMOVAL.
a.
Removal.
(1)
Place drain pan under oil cooler (1).
(2)
Remove draincock (2) from oil cooler housing (1).
(3)
Loosen clamp (3) on oil cooler housing (1).
Inlet and outlet openings in oil cooler core are marked IN and OUT. Make sure oil cooler
is reinstalled in original position to prevent oil flow from being reversed. If openings are not
identified, note position and mark them.
(4)
Remove 12 screws (4), lockwashers (5), oil cooler housing (1), gasket (6), oil cooler core (7) and gasket (8)
from oil cooler adapter cover (9). Discard gaskets and lockwashers.
(5)
Remove clamp (3) and seal (10) from oil cooler outlet elbow (11). Discard seal.
|