|
| |
TM 9-2320-364-34-4
20-238
20-67. PISTON, CONNECTING ROD AND LINER INSTALLATION (CONT).
(21)
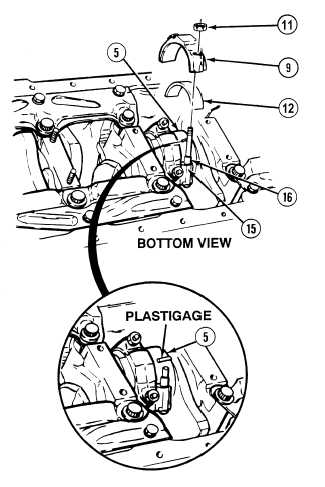
Seat connecting rod (15) firmly on
crankshaft journal (5).
(22)
Wipe oil from bearing shells (12) and
crankshaft journals (5).
(23)
Place strip of plastic gage across width of
bearing shell (12) 1/4 in. (6.35 mm) from
center.
(24)
Install bearing shell (12) and cap (9) over
two screws (16).
(25)
Install two nuts (11) and tighten 60 to 70
lb-ft (81 to 95 N.m).
(26)
Remove two nuts (11) from screws (16).
(27)
Remove cap (9) from screws (16).
NOTE
Width must be minimum of
0.0008 in. (0.0203 mm) and
maximum of 0.0056 in. (0.1422
mm). If measurement cannot be
obtained, replace upper and
lower bearing shells.
(28)
Measure widest part of plastic gage with
measuring strip.
(29)
Wipe plastic gage from bearing shells (12)
and crankshaft journals (5) and coat with
lubricating oil.
(30)
Install bearing shell (12) and cap (9) over
two screws (16).
(31)
Install two nuts (11) and tighten 60 to 70
lb-ft (81 to 95 N.m).
|