|
| |
TM 9-2320-364-34-4
23-9
c.
Installation.
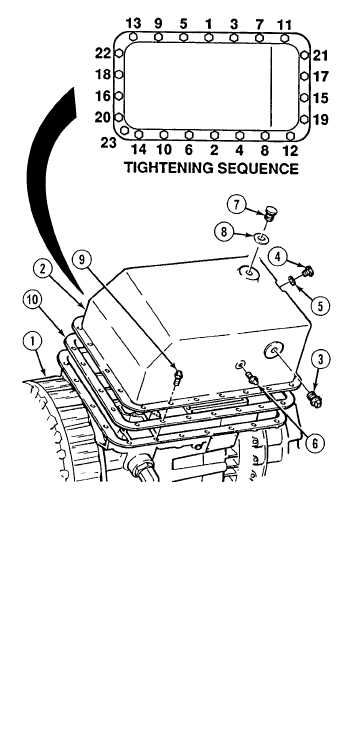
(1)
Install gasket (10) on transmission (1).
Adhesives, solvents, and sealing
compounds can burn easily, can
give off harmful vapors, and are
harmful to skin and clothing. To
avoid injury or death, keep away
from open fire and use in well-
ventilated area. If adhesive,
solvent, or sealing compound
gets on skin or clothing, wash
immediately with soap and
water.
(2)
Coat 23 screws (9) with sealing compound.
(3)
Install oil pan (2) on transmission (1) with
23 screws (9). Tighten screws in sequence
shown to 120 to 156 lb-in (14 to 18 N.m).
(4)
Coat threads of plugs (3) and (6) with
sealing compound.
(5)
Install plugs (3) and (6) in oil pan (2).
Tighten plug (3) 75 to 80 lb-ft (102 to 108
N.m). Tighten plug (6) to 120 to 144 lb-in
(14 to 16 N.m).
(6)
Install washer (5) and plug (4) in oil pan (2).
Tighten plug to 180 to 240 lb-in (20 to 27
N.m).
NOTE
Perform Step (7) if oil pan is
equipped with a corner drain
plug.
(7)
Install plug (7) and gasket (8) from oil pan
(2). Tighten plug to 180 to 240 lb-in (20 to
27 N.m).
d.
Follow-On Maintenance:
Remove transmission from stand,
(Para 23-2).
END OF TASK
|