|
| |
TM 9-2320-364-34-4
25-111
Materials/Parts
Adhesive (Item 1, Appendix B)
Sealing Compound (Item 56, Appendix B)
Locknuts (8) (Item 217, Appendix E)
This task covers:
a. Removal
b. Installation
c. Follow-On Maintenance
INITIAL SETUP
Equipment Condition
Axle air brake chambers removed, (Para 25-18)
Axle air lines removed, (Para 25-30)
Tools and Special Tools
Tool Kit, General Mechanic’s
(Item 240, Appendix F)
Socket, Socket Head Screw 12 mm
(Item 206, Appendix F)
Wrench, Torque (0 to 175 lb-ft [0-237 N.m])
(Item 277, Appendix F)
Extractor, Jet (Appendix C)
25-19. AXLE NO. 3 AND 4 PLANETARY HUB GEAR REPLACEMENT.
a.
Removal.
NOTE
Studs may come off with
locknuts.
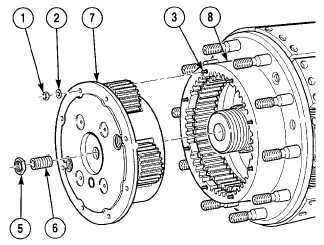
(1)
Remove eight locknuts (1) and washers (2)
from studs (3). Discard locknuts.
NOTE
Screw may come off with nut. If
this happens, separate screw and
nut and install screw.
(2)
Hold hub (4) and remove nut (5) from
screw (6).
(3)
Turn screw (6) to the right until planetary
gear carrier assembly (7) is separated from
ring gear carrier assembly (8). Remove
screw (6) from planetary gear assembly (7).
(4)
Remove planetary gear carrier assembly (7)
from ring gear carrier assembly (8).
|