|
| |
TM 9-2320-364-20-4
6-34
6-5. RADIATOR REPLACEMENT (CONT).
NOTE
If fan clearance is correct, go to Step (29). If fan clearance is not correct, perform
Step (24).
If fan motor was replaced, four locknuts in Step (24) will be loose and do not need to be
discarded. If fan motor was not replaced, four locknuts need to be discarded.
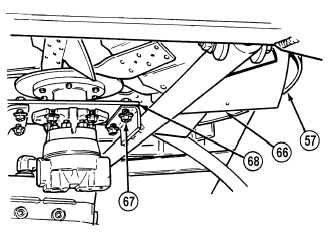
(24)
Remove and discard four locknuts (67) from
fan mounting plate (68).
(25)
With the aid of an assistant, adjust fan (66)
until fan is centered under fan shroud (57).
(26)
Position four locknuts (67) on fan mounting
plate (68).
(27)
Check for even distance of blades of fan (66)
to fan shroud (57).
(28)
Tighten four locknuts (67) on fan mounting
plate (68).
Adhesives, solvents, and sealing
compounds can burn easily, can
give off harmful vapors, and are
harmful to skin and clothing. To
avoid injury or death, keep away
from open fire and use in well-
ventilated area. If adhesive,
solvent, or sealing compound
gets on skin or clothing, wash
immediately with soap and water.
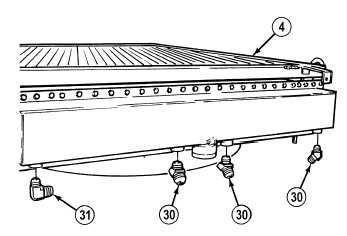
(29)
Apply sealing compound on threads of three
fittings (30) and fitting (31).
NOTE
Four fittings in Step (30) are
installed to position noted prior
to removal.
(30)
Install three fittings (30) and fitting (31) in
cooling assembly (4).
|