|
| |
TM 9-2320-364-20-4
7-223
b.
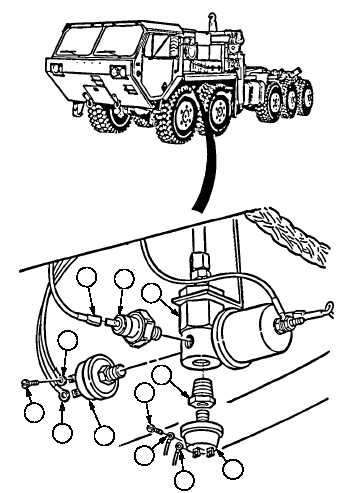
Installation.
Adhesives, solvents, and sealing
compounds can burn easily, can
give off harmful vapors, and are
harmful to skin and clothing. To
avoid injury or death, keep away
from open fire and use in a well-
ventilated area. If adhesive,
solvent, or sealing compound
gets on skin or clothing, wash
immediately with soap and
water.
(1)
Coat threads of oil pressure switch (7) with
sealing compound and install in
manifold (3).
(2)
Install wire 1517 (5) and wire 1871 (6) on
oil pressure switch (7) with two screws (4).
Apply electrical sealant to terminals.
(3)
Install oil pressure switch (2) in
manifold (3).
(4)
Install wire 1032 (1) on oil pressure
switch (2).
NOTE
Perform Steps (5) through (7) if
truck is equipped with 200 AMP
alternator.
(5)
Install reducer (12) and oil pressure switch
(11) in manifold (3).
(6)
Install wire 1020B (10) and wire 1020A (9) on
oil pressure switch (11) with two screws (8).
(7)
Apply electrical sealant to two screws (8).
c.
Follow-On Maintenance:
Install left front fender skirt, (Para 17-34).
Connect batteries, (Para 7-87).
Remove wheel chocks, (TM 9-2320-364-10).
END OF TASK
4
1
2
3
5
6
7
10
9
11
12
8
|