|
| |
TM 9-2320-364-34-2
4-6
4-2. FUEL INJECTOR REPAIR (CONT).
Do not tighten screws more than
5 lb-in (0.6 N.m).
(4)
Tighten four screws (1) to 19 lb-in (2.15
N.m) in sequence shown.
(5)
Stamp the last four digits of injector part
number on load plate (2).
e.
Installation.
NOTE
There are eight fuel injectors.
All fuel injectors are installed
the same.
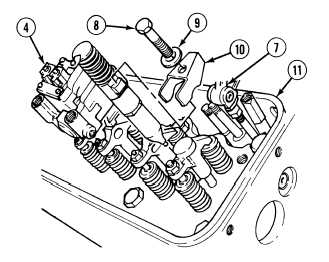
(1)
Position fuel injector (4) in cylinder
head (11).
Ensure clamp does not
interfere with injector spring
or valve springs. Interference
of clamp with spring travel
can cause damage to
components.
Do not force rocker arms all
the way back with shaft in
place. Only position rocker
arm back far enough to access
fuel injector. Failure to
comply may result in damage
to push rods.
NOTE
Convex side of washer is
installed facing clamp.
(2)
Lift rocker arms (7) and install clamp (10),
washer (9) and screw (8) on fuel injector (4).
Tighten screw to 20 to 25 lb-ft (27 to 34 N.m).
(3)
Position rocker arms (7) back down on fuel
injector (4).
4TH
2ND
1ST
3RD
4 DIGIT
PART NO.
1
2
TIGHTENING
SEQUENCE
|