|
| |
TM 9-2320-364-34-2
5-14
5-4. LEFT SIDE THERMOSTAT HOUSING REPLACEMENT (CONT).
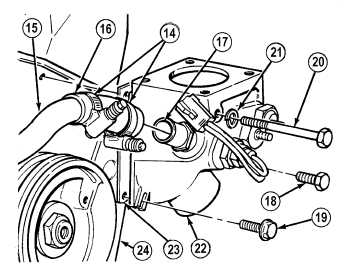
(5)
Loosen two clamps (14) on crossover
tube (15) and slide hose (16) from
adapter (17) onto crossover tube.
(6)
Remove screws (18), (19) and (20) and
lockwasher (21) from lower left thermostat
housing (22). Discard lockwasher.
(7)
Remove housing (22) and gasket (23) from
left cylinder head (24). Discard gasket.
b.
Installation.
(1)
Coat both sides of gasket (23) with grease.
(2)
Position gasket (23) on thermostat
housing (22).
(3)
Install gasket (23) and housing (22) on
cylinder head (24) with lockwasher (21) and
screws (20), (19) and (18). Tighten screws to
23 to 26 lb-ft (31 to 35 N.m).
(4)
Position hose (16) on adapter (17) and
crossover tube (15) and tighten two
clamps (14).
(5)
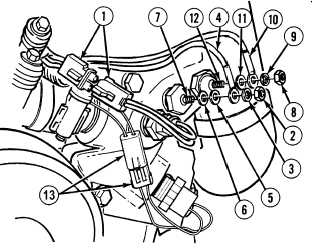
Install washer (11), wire 1147 (10),
lockwasher (9) and nut (8) on sensor (12).
(6)
Install washer (6), washer (5), wire 1320 (4),
lockwasher (3) and nut (2) on sensor (7).
(7)
Connect MC61 connector (1).
(8)
Connect MC128 connector (13).
c.
Follow-On Maintenance:
Install left thermostat, (TM 9-2320-364-20).
Remove wheel chocks, (TM 9-2320-364-10).
END OF TASK
|