|
| |
TM 9-2320-364-34-2
10-24
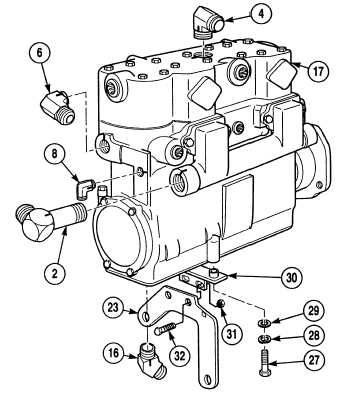
10-4. AIR COMPRESSOR REPLACEMENT (CONT).
(3)
Install bracket (30) on air compressor
mounting bracket (23) with two screws (32)
and locknuts (31).
(4)
Install bracket (30), two washers (29),
lockwashers (28) and screws (27) in air
compressor (17).
Adhesives, solvents, and sealing
compounds can burn easily, can
give off harmful vapors, and are
harmful to skin and clothing. To
avoid injury or death, keep away
from open fire and use in a well-
ventilated area. If adhesive,
solvent, or sealing compound
gets on skin or clothing, wash
immediately with soap and
water.
(5)
Apply sealing compound to elbows (2), (4),
(6), (8) and (16).
(6)
Install elbows (2), (4), (6), (8) and (16) in
air compressor (17).
(7)
Apply grease to gasket (26) and install on air
compressor (17).
Air compressor weighs 115 lbs
(52 kg). Attach suitable lifting
device prior to installation to
prevent possible injury.
(8)
Attach lifting device to air compressor (17).
(9)
Install drive coupling (25) on air
compressor (17).
(10)
Align drive coupling (25) in engine (24).
(11)
Install air compressor (17) on engine (24).
(12)
Install two lockwashers (22) and screws
(21) in air compressor mounting bracket
(23). Tighten screws to 80 lb-ft (108 N.m).
|