|
| |
TM 9-2320-364-34-3
13-46
13-10. REAR TANDEM CROSSMEMBER/GUSSET REPLACEMENT (CONT).
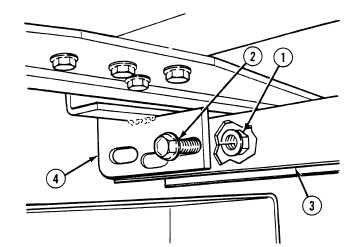
NOTE
Center hard lift crossmember
between hard lift brackets.
(14)
Position hard lift crossmember (3) in each
end of hard lift bracket (4).
NOTE
Tighten rear locknuts with an
extension through front bracket
holes.
(15)
Install six screws (2) in rear of hard lift
bracket (4) with six locknuts (1).
(16)
Install six screws (2) in front of hard lift
bracket (4) with six locknuts (1).
g.
Follow-on Maintenance:
Install spring brake relay valve No. 2, (TM 9-2320-364-20).
Install load sensing valves, (TM 9-2320-364-20).
Install Axle No. 4 and No. 5 longitudinal torque rods, (Para 14-9).
Install drive shaft between Axle No. 4 and No. 5, (TM 9-2320-364-20).
Install service brake No. 3, (TM 9-2320-364-20).
Install tractor protection valve, (TM 9-2320-364-20).
Install rear cable tensioner, (if equipped with SRW) (TM 9-2320-364-20).
Install rear steering gear, (Para 12-11).
Install reverse alarm, (TM 9-2320-364-20).
Install Axle No. 5 tires, (TM 9-2320-364-10).
Start engine and build air pressure to 125 psi (861 kpa). Check air lines and fittings for leaks.
Remove wheel chocks, (TM 9-2320-364-10).
END OF TASK
|