|
| |
TM 9-2320-364-34-4
20-119
(5)
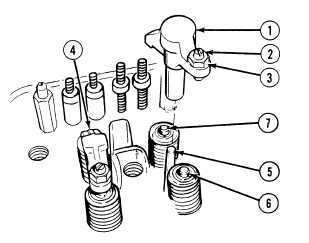
Install valve bridges (1) and (4) on valve
bridge guides (5), making sure grooves in
valve bridges fit over top of valve stem (7).
(6)
Push down on top of valve bridges (1)
and (4) and turn adjusting screw (2) until
adjusting screw (2) just touches valve
stem (6).
(7)
Tighten screw (2) an additional 1/4-turn and
tighten nut (3).
(8)
Remove valve bridges (1) and (4) from
valve bridge guides (5) and position in
soft-jawed vise.
(9)
Hold screw (2) and tighten nut (3) to
20 to 25 lb-ft (27 to 34 N.m).
(10)
Remove valve bridges (1) and (4) from soft
jawed vise.
(11)
Coat valve bridges (1) and (4) and valve
bridge guides (5) with lubricating oil.
(12)
Install valve bridges (1) and (4) on valve
bridge guides (5) making sure grooves in
valve bridges fit over top of valve stem (7).
(13)
Insert 0.0015 in. (0.0381 mm) feeler gage
between end of valve bridges (1) and (4) and
exhaust valve stem (6).
(14)
Press down on top surface of valve
bridges (1) and (4). Feeler gage must be
tight.
(15)
Repeat Steps (13) and (14) for other end of
valve bridges (1) and (4).
d.
Follow-On Maintenance:
Install rocker arms, (Para 20-45).
END OF TASK
|