|
| |
TM 9-2320-364-34-4
20-180
20-60. PISTON AND CONNECTING ROD REPAIR (CONT).
(13)
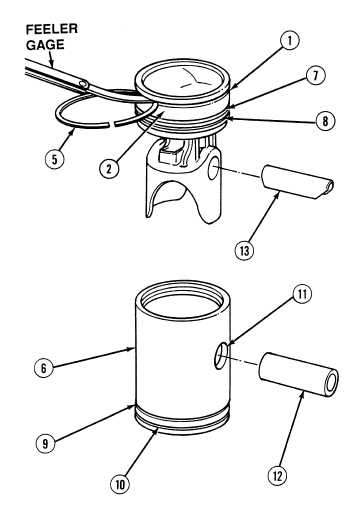
Using feeler gage and piston ring (5),
measure ring to groove clearance in piston
crown (2) and piston skirt (6).
(14)
Fire ring groove (1) clearance must be
between minimum of 0.0010 in. (0.0254 mm)
and maximum of 0.0070 in. (0.178 mm).
(15)
Top compression groove (7) clearance must
be between minimum of 0.0100 in.
(0.2540 mm) and maximum of 0.0220 in.
(0.5588 mm).
(16)
Bottom compression groove (8) clearance
must be between minimum of 0.0040 in.
(0.1016 mm) and maximum of 0.0130 in.
(0.3302 mm).
(17)
Using two piston rings, measure oil control
grooves (9) and (10). Clearance must be
between minimum of 0.0015 in. (0.0381 mm)
and maximum of 0.0080 in (0.2032 mm).
(18)
Measure diameter of piston skirt (6).
Diameter must be minimum of 4.8318 in.
(12.2728 cm) and maximum of 4.8340 in.
(12.2784 cm).
(19)
Using telescoping gage and micrometer,
measure piston pin bore (11) in piston
skirt (6). Diameter must be between
minimum of 1.5025 in. (3.8164 cm) and
maximum of 1.5040 in. (3.8202 cm).
(20)
Measure piston pin (12) diameter. Diameter
must be between minimum of 1.4980 in.
(3.8049 cm) and maximum of 1.5000 in.
(3.8100 cm).
(21)
Inspect pin bearing (13) for scoring or wear.
Bearing thickness must be between
minimum of 0.0860 in. (2.1844 mm) and
maximum of 0.0880 in. (2.2352 mm).
NOTE
Piston crown, bearing and pin
must be replaced as an assembly.
(22)
Replace parts that are not within
specification.
|

