|
| |
TM 9-2320-364-34-4
20-296
Materials/Parts
Grease (Item 21, Appendix B)
Sealing Compound (Item 56, Appendix B)
Gasket (2) (Item 115, Appendix E)
Gasket (Item 116, Appendix E)
This task covers:
a. Installation
b. Follow-On Maintenance
INITIAL SETUP
Equipment Condition
Air box drain installed, (Para 20-89)
Tools and Special Tools
Tool Kit, General Mechanic’s
(Item 240, Appendix F)
Wrench Set, Socket 3/8 in. Drive
(Item 273, Appendix F)
Wrench, Torque (0-60 N.m)
(Item 276, Appendix F)
20-90. AIR BOX COVERS INSTALLATION.
a.
Installation.
Adhesives, solvents, and sealing compounds can burn easily, can give off harmful vapors, and
are harmful to skin and clothing. To avoid injury or death, keep away from open fire and use
in well-ventilated area. If adhesive, solvent, or sealing compound gets on skin or clothing,
wash immediately with soap and water.
NOTE
Right and left air box covers are installed the same way. Right side shown.
Left side air box cover can not be installed with engine stand installed.
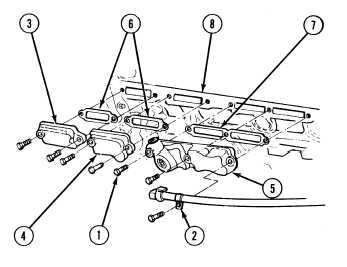
(1)
Coat two gaskets (6) and gasket (7) with
grease.
(2)
Position gaskets (6) and (7) on engine
block (8).
(3)
Coat threads of seven screws (1) with
sealing compound.
(4)
Install air box covers (3), (4) and (5),
cushion clip (2) on engine block (8) with
seven screws (1). Tighten screws to 96 to
144 lb-in (11 to 16 N.m).
b.
Follow-On Maintenance:
Install timing and synchronous reference
sensor, (Para 20-91).
END OF TASK
|

