 |
|||
|
|
|||
|
Page Title:
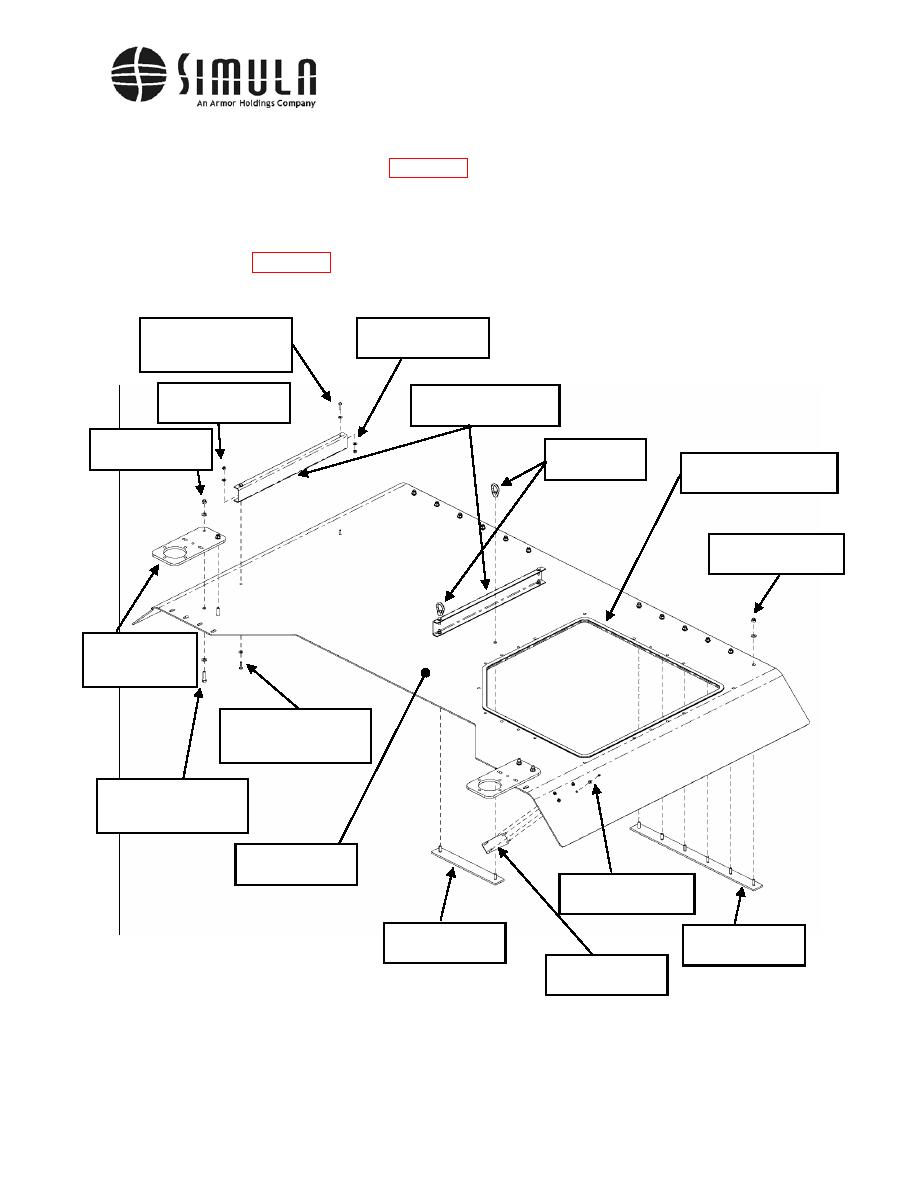
Install Armor kit, Roof, PLS, P/N 113340-1-103 |
|
||
| ||||||||||
|
|
 II113300-1-103
Rev. A
a) Attach all of the parts shown in Figure 38 to the Roof Panel (P/N 113341-1-103) using
the hardware indicated in the figure.
b) Install the Bulb Seal (P/N 103B375B3X3/16E) around the Escape Hatch opening with
the rubber bulb facing upward. Start one end of the Bulb Seal on a flat section of the
opening (see Figure 39). If necessary, use a rubber mallet to assist in the installation.
Bolt, Hex Head,
Lock Nut 0.250-20,
0.250-20 x 1.000 Long,
Washer 0.250 ID
Washer 0.250 ID
Lock Nut 0.250-20,
Roof Hatch Channels,
Washer 0.250 ID
P/N 113347-1-103
Lock Nut 0.375-16,
Eye Nuts,
Washer 0.375 ID
Bulb Seal,
P/N 106795-1
P/N 103B375B3X3/16E
Lock Nut 0.375-16,
Washer 0.375 ID
Antenna Mount
(Qty 2),
P/N 113348-1-103
Bolt, Hex Head,
0.250-20 x 1.000 Long,
Washer 0.250 ID
Bolt, Hex Head,
0.375-16 x 1.500 Long,
Washer 0.375 ID
Roof Panel,
P/N 113341-1-103
Lock Nut 0.190-32,
Washer 0.190 ID
Roof Stud Plate,
Roof Stud Plate,
P/N 106780-3-103
P/N 106780-1-103
Stud Plate,
P/N 113349-1-103
0037 00-67
|
|
Privacy Statement - Press Release - Copyright Information. - Contact Us |
