|
| |
TM 9-2320-364-34-4
27-9
NOTE
Bearing assemblies are adjusted
by removing or adding shims
until the bearings bind and then
add one shim at a time until shaft
assemblies rotate freely with no
end play, red shim = 0.002 in.
(0.05 mm) and blue shim = 0.005
in. (0.13 mm).
(14)
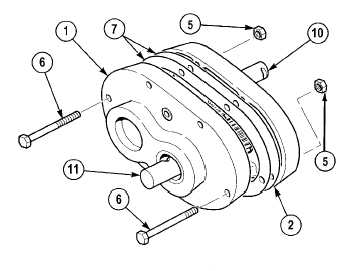
Check input housing (1) and output housing
(2) adjustment to ensure shaft assemblies
(10) and (11) rotate freely with no end play.
NOTE
If shaft assembly binds or
has end play, go to next step.
If shaft assembly rotates
freely and has no end-play,
go to Step (16).
(15)
Remove six screws (6), nuts (5) and input
housing (1) from output housing (2).
(16)
Add or subtract required shims (7) between input housing (1) and output housing (2) and reinstall
screws (6) and nuts (5). Repeat Steps (15) and (16) until shaft assemblies (10) and (11) rotate freely with
no end-play.
(17)
Remove six nuts (5).
Adhesives, solvents, and sealing compounds can burn easily, can give off harmful vapors,
and are harmful to skin and clothing. To avoid injury or death, keep away from open fire
and use in a well-ventilated area. If adhesive, solvent, or sealing compound gets on skin or
clothing, wash immediately with soap and water.
Do not allow sealing compound to get on equipment or bearings or damage to bearings and
equipment may result.
(18)
Apply sealing compound to both sides of shims (7) and reposition shims and input housing (1) on output
housing (2).
(19)
Apply sealing compound to threads and install six nuts (5). Tighten nuts to 20 lb-ft (27 N.m).
|