|
| |
TM 9-2320-364-20-4
7-162
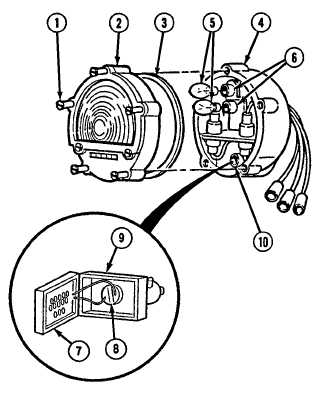
7-46. FRONT COMPOSITE LIGHT REPAIR (CONT).
b.
Disassembly.
(1)
Loosen five captive screws (1), and remove
cover (2) and gasket (3) from composite
light (4). Discard gasket.
(2)
Push in and remove two lamps (5) and (6)
from lamp sockets (7) and (8).
(3)
Open blackout marker lamp door (9).
Keep all moisture and oils off
lamp. Do not touch lamp
with bare hands. Use a clean
dry, oil free cloth to hold
lamp while installing lamp in
blackout light.
Turning base screw too far
could damage blackout
marker lamp.
(4)
Push in and rotate blackout marker lamp
base screw (10) counterclockwise and
remove blackout marker lamp (11) from
blackout marker lamp socket (12).
c.
Cleaning/Inspection.
(1)
Inspect lamp sockets for corrosion.
(2)
Inspect lenses for cracks.
(3)
Inspect light housing for cracks.
d.
Assembly.
Corrosion inhibitor contains alkali. Do not get in eyes; wear goggles/safety glasses when
using. Avoid contact with skin. In case of contact, immediately wash area with soap and
water. If eyes are contacted, flush eyes with large amounts of water for at least 15 minutes
and get immediate medical attention.
(1)
Apply anti-corrosion silicone compound to inside of blackout marker lamp socket (12) and two lamp
sockets (7) and (8).
(2)
Open blackout marker lamp door (9).
(3)
Install blackout marker lamp (11) in blackout marker lamp socket (12) and push in and rotate blackout
marker lamp base screw (10) clockwise.
(4)
Close blackout marker lamp door (9).
(5)
Push in and install two lamps (5) and (6) in lamp sockets (7) and (8).
(6)
Install preformed packing (3), composite light cover (2) with five captive screws (1) in composite light
housing (4).
|