|
| |
TM 9-2320-364-20-5
17-77
Materials/Parts
Lockwasher (6) (Item 171, Appendix F)
Pin, Cotter (3) (Item 273, Appendix F)
This task covers:
a. Removal
b. Installation
c. Follow-On Maintenance
INITIAL SETUP
Equipment Condition
Engine OFF, (TM 9-2320-364-10)
Wheels chocked, (TM 9-2320-364-10)
Spare tire removed, (TM 9-2320-364-10)
Tools and Special Tools
Tool Kit, General Mechanic’s: Automotive
(Item 74, Appendix G)
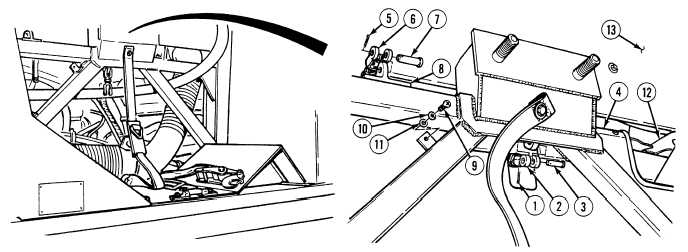
17-26. RIGHT SIDE NOISE PANEL REPLACEMENT.
a.
Removal.
(1)
Remove and discard cotter pin (1) from clevis yoke (2).
(2)
Remove clevis pin (3) from clevis yoke (2).
(3)
Slide clevis yoke (2) downward through right side noise panel (4).
(4)
Remove and discard two cotter pins (5) from clevis yoke (6).
(5)
Remove two clevis pins (7) from clevis yoke (6).
(6)
Remove clevis yoke (6) from two clevis studs (8).
(7)
Remove six screws (9), lockwashers (10) and washers (11) from right side noise panel (4). Discard
lockwashers.
(8)
Pull rubber flap (12) out from under fan shroud (13).
|