|
| |
TM 9-2320-364-20-5
18-78
18-15. SELF-RECOVERY WINCH (SRW) REAR TENSION GUIDE REPAIR (CONT).
c.
Cleaning/Inspection.
Drycleaning Solvent (P-D-680) is TOXIC and flammable. Wear protective goggles, face
shield, and gloves; use only in a well-ventilated area; avoid contact with skin, eyes, and
clothes, and do not breathe vapors. Keep away from heat or flame. Never smoke when using
solvent. The flashpoint for Type II Drycleaning Solvent is 140 degrees F (60 degrees C) and
Type III Drycleaning Solvent is 200 degrees F (93 degrees C). Failure to do so may result in
injury or death to personnel.
If personnel become dizzy while using cleaning solvent, immediately get fresh air and
medical help. If solvent contacts skin or clothes, flush with cold water. If solvent contacts
eyes, immediately flush eyes with water and get immediate medical attention.
Compressed air used for cleaning purposes will not exceed 30 psi (207 kPa). Use only with
effective chip guarding and personal protective equipment (goggles/shield, gloves, etc).
Failure to comply may result in injury or death to personnel.
(1)
Clean parts with drycleaning solvent.
(2)
Wipe parts with clean cloth.
(3)
Dry parts with compressed air.
(4)
Inspect parts for cracks, gouges, and broken welds.
(5)
Replace all damaged parts.
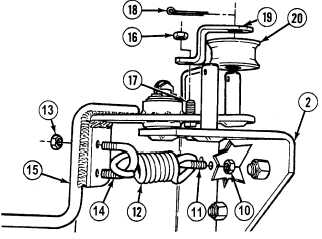
d.
Assembly.
(1)
Install roller assembly (20) and bracket (19)
on tension pivot assembly (15).
(2)
Install cotter pin (18) in tension pivot
assembly (15).
(3)
Install locknut (16) on screw (17).
(4)
Install spring (12) and U-bolt (14) on
tension pivot assembly (15) with two
locknuts (13). Tighten locknuts until three
threads show on U-bolt ends.
(5)
Install spring (12) and U-bolt (11) on rear
tension guide assembly (2) with two
locknuts (10). Tighten locknuts until three
threads show on U-bolt ends.
|