|
| |
TM 9-2320-364-34-2
3-120
3-18. EXHAUST VALVE REPLACEMENT (CONT).
(5)
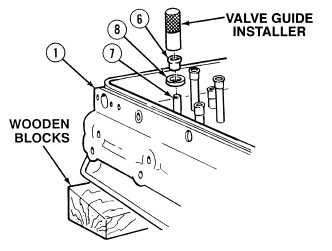
Position cylinder head (1) right side up on wooden blocks.
(6)
Install valve seat (8) over valve guide (7).
NOTE
Plastic cap which comes with oil seal may be placed over exhaust valve to protect exhaust valve
from being scratched upon installation of valve guide seal. Ensure plastic cap is removed after
installation of valve guide seal.
(7)
Using valve guide installer, install valve
guide seal (6) on valve guide (7).
(8)
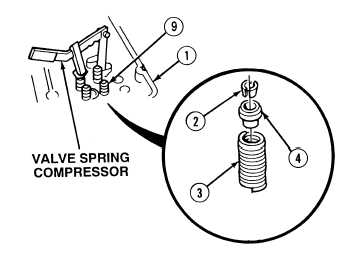
Install valve spring (3) and spring cap (4) in
cylinder head (1).
(9)
Install spring compressor on cylinder
head (1).
Use care when installing springs.
Springs are under tension and can
act as projectiles when released
and could cause injury to
personnel.
Compress spring only enough to
permit installation of two-piece
valve lock. If spring is
compressed further than needed,
damage may result to valve guide
oil seal.
(10)
Compress valve spring (3) using valve
spring compressor on spring cap (4).
(11)
Install two-piece valve lock (2) on spring
cap (4) and valve stem (9).
(12)
Release pressure on valve spring (3) and
remove valve spring compressor from
cylinder head (1).
(13)
Tap end of valve stem (9) with soft faced hammer to properly seat two-piece valve locks (2).
(14)
Remove tape from bottom of cylinder head (1).
c.
Follow-On Maintenance:
Install exhaust valve bridges, (Para 3-17).
Install cylinder head, (Para 3-7).
Remove wheel chocks, (TM 9-2320-364-10).
END OF TASK
|


