|
| |
TM 9-2320-364-34-2
9-115
NOTE
To remove locking cylinder pull
left and outward.
(8)
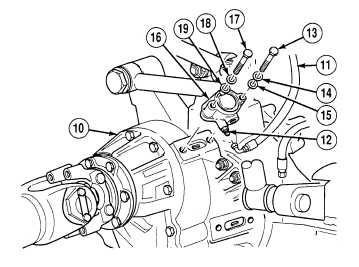
Remove locking cylinder (16) from
differential (10) by pulling left and outward
on locking cylinder.
b.
Installation.
Adhesives, solvents, and sealing
compounds can burn easily, can
give off harmful vapors, and are
harmful to skin and clothing. To
avoid injury or death, keep away
from open fire and use in well-
ventilated area. If adhesive,
solvent, or sealing compound
gets on skin or clothing, wash
immediately with soap and
water.
(1)
Coat mating surface of locking cylinder (16)
with adhesive.
(2)
Position locking cylinder (16) on
differential (10).
(3)
Position plastic washer (19), washer (18)
and screw (17) on locking cylinder (16).
NOTE
If a new locking cylinder was installed or axle differential was removed, perform Steps (4)
and (6). If the same locking cylinder was installed, perform Steps (5) and (7).
Install screw only to keep screw hole in locking cylinder aligned with differential. Screw
should be positioned so that three or four threads of screw are engaged.
(4)
Position washer (14) and screw (13) on locking cylinder (16).
(5)
Position washer (14), shim kit (15) and screw (13) on locking cylinder (16).
(6)
Tighten screw (17) on locking cylinder (16) 22 to 32 lb-ft (30 to 43 N.m).
(7)
Tighten screws (13) and (17) on locking cylinder (16) 22 to 32 lb-ft (30 to 43 N.m).
(8)
Install air line 2056 (Axle No. 2) or 2422 (Axle No. 4) (11) to fitting (12).
|