|
| |
TM 9-2320-364-34-3
14-40
Materials/Parts
Grease (Item 21, Appendix B)
Oil, Lubricating (Item 37, Appendix B)
This task covers:
a. Axle No. 1 Lateral Torque Rod Replacement
d. Axle No. 4 Lateral Torque Rod Replacement
b Axle No. 2 Lateral Torque Rod Replacement
e. Axle No. 5 Lateral Torque Rod Replacement
c. Axle No. 3 Lateral Torque Rod Replacement
f. Follow-On Maintenance
INITIAL SETUP
Personnel Required
Two
Equipment Condition
Engine OFF, (TM 9-2320-364-10)
Wheels chocked, (TM 9-2320-364-10)
LHS fully extended, (TM 9-2320-364-10)
(Axles No. 3 and No. 4 only)
Rear hardlift assembly removed,
(TM 9-2320-364-20) (Axle No. 5 only)
Tools and Special Tools
Tool Kit, General Mechanic’s
(Item 240, Appendix F)
Hammer, Hand, Soft Plastic,
(Item 88, Appendix F)
Jack, Kit, Hydraulic, Hand
(Item 129, Appendix F)
Wrench Set, Socket 3/4 in. Drive
(Item 274, Appendix F)
Wrench, Torque (0-600 lb-ft [0-814 N.m])
(Item 278, Appendix F)
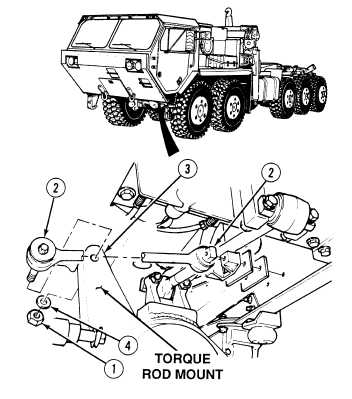
14-8. LATERAL TORQUE ROD REPLACEMENT.
Materials/Parts - Continued
Tags, Identification (Item 72, Appendix B)
Locknut (10) (Item 166, Appendix E)
Locknut (5) (Item 181, Appendix E)
Locknut (2) (Item 192, Appendix E)
a.
Axle No. 1 Lateral Torque Rod Replacement.
(1)
Removal.
(a)
Loosen locknut (1) until locknut is
even with threaded end of torque
rod (2).
Torque rod is under extreme
pressure when being pressed
from axle. Torque rod can be
dangerous when it breaks loose
and could cause injury to
personnel.
(b)
With the aid of an assistant and use of a
hand jack kit, press tapered end of
torque rod (2) from axle (3) while
striking torque rod mount with soft
faced hammer.
(c)
Remove locknut (1) and washer (4)
from torque rod (2). Discard locknut.
|