|
| |
TM 9-2320-364-34-4
20-202
20-63. MAIN BEARING AND CRANKSHAFT REPAIR (CONT).
NOTE
If timing gear does not meet specifications, replace timing gear.
(14)
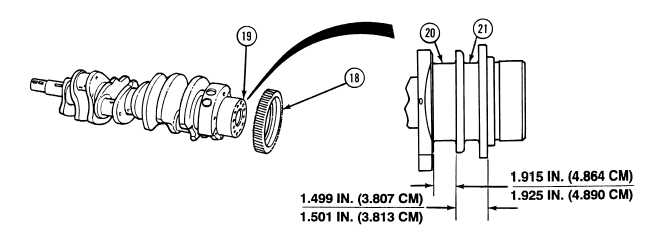
Using a micrometer and telescoping gage, measure crankshaft to timing gear clearance as follows:
(a)
Measure timing gear (18) inside diameter. Inside diameter of timing gear should be minimum of
5.2490 in. (13.3325 cm) and maximum of 5.2510 in. (13.3375 cm).
(b)
Measure diameter of crankshaft at timing gear surface (19). Record measurement.
(c)
Crankshaft to timing gear clearance must not exceed 0.001 in. (0.025 mm).
(d)
Replace timing gear (18) if not within specification.
(15)
Using a micrometer and telescoping gage, measure crankshaft thrust washer surface width.
(a)
Rear main thrust washer surface (20) width must be minimum of 1.499 in. (3.807 cm) and
maximum of 1.501 in. (3.813 cm).
(b)
Counterweight thrust washer surface (21) width must be minimum of 1.915 in. (4.864 cm) and
maximum of 1.925 in. (4.890 cm).
(16)
Replace any part failing inspection.
|

