|
| |
TM 9-2320-364-34-4
20-233
(34)
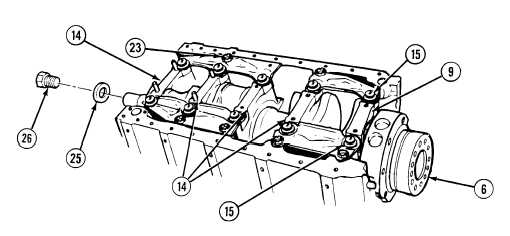
Tighten two screws (15) on rear bearing cap (9) 50 lb-ft (68 N.m).
(35)
Strike both ends of crankshaft (6) two or three blows with soft-face hammer.
(36)
Strike rear bearing cap (9) with soft-face hammer.
(37)
Tighten two screws (15) on rear bearing cap (9) to 110 lb-ft (149 N.m).
(38)
Strike rear bearing cap (9) with soft-face hammer.
(39)
Tighten two screws (15) on rear bearing cap (9) 230 to 240 lb-ft (312 to 325 N.m).
(40)
Tighten seven lockscrews (23) 70 to 75 lb-ft (95 to 102 N.m).
(41)
Install retainer (25) and screw (26).
(42)
Turn screw (26) clockwise to make sure crankshaft turns freely and smoothly.
(43)
Position dial indicator on engine block (27)
and push crankshaft (6) toward gage with
pry bar. Adjust dial indicator to zero.
(44)
Read end play after repositioning pry bar
and forcing crankshaft (6) in opposite
direction. Minimum end play is 0.004 in.
(0.102 mm) and maximum end play is
0.018 in. (0.457 mm). If end play is
outside limits, replace crankshaft.
b.
Follow-On Maintenance:
Install engine oil pump drive gear,
(Para 20-66).
END OF TASK
|