|
| |
TM 9-2320-364-34-4
20-251
Materials/Parts
Cloth, Cleaning (Item 11, Appendix B)
Compound, Retaining (Item 17, Appendix B)
Oil, Lubricating (Item 36, Appendix B)
Gasket (Item 79, Appendix E)
Key (4) (Item 142, Appendix E)
Lockwasher (2) (Item 258, Appendix E)
Lockwasher (12) (Item 292, Appendix E)
Screw, Self-Locking (2) (Item 556, Appendix E)
Setscrew (6) (Item 625, Appendix E)
This task covers:
a. Installation
b. Follow-On Maintenance
INITIAL SETUP
Equipment Condition
Rear cylinder block plate installed, (Para 20-72)
Tools and Special Tools
Tool Kit, General Mechanic’s
(Item 240, Appendix F)
Dial, Indicator, Set w/Magnetic Base
(Item 98, Appendix F)
Wrench Set, Socket 3/8 in. Drive
(Item 273, Appendix F)
Wrench, Torque (0-60 N.m)
(Item 276, Appendix F)
Wrench, Torque (0 to 175 lb-ft [0-237 N.m])
(Item 277, Appendix F)
20-73. CAMSHAFT ASSEMBLY INSTALLATION.
a.
Installation.
Use care when installing
camshaft assemblies. Camshafts
can be damaged by scraping or
hitting engine block or hard
surface.
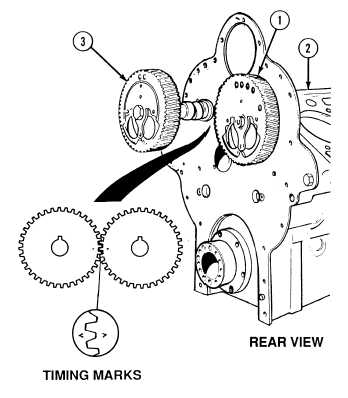
(1)
Coat right-hand camshaft assembly (1)
with lubricating oil and position in
engine block (2).
(2)
Coat left-hand camshaft assembly (3)
with lubricating oil and position in
engine block (2).
(3)
Align camshaft assembly gears (1) and (3)
so that timing marks on gears line up as
shown.
(4)
Slide camshaft assembly gears (1) and (3)
into place until fully meshed.
(5)
Check timing marks again to make sure
gears are aligned as shown.
|