|
| |
TM 9-2320-364-34-2
4-22
4-4. BLOWER ASSEMBLY REPLACEMENT (CONT).
(14)
Position four retainers (45) and screws (44)
in blower (5).
(15)
Position bracket (43), retainer (45) and
screw (44) in blower (5).
(16)
Remove lifting device from blower (5).
(17)
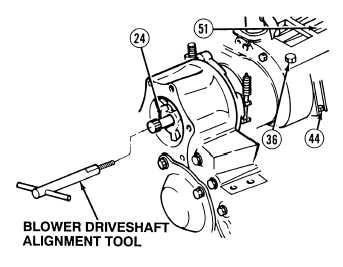
Remove rag from driveshaft (24).
(18)
Install blower driveshaft alignment tool in
blower driveshaft (24).
(19)
Rotate blower lobes (51) in 90 degree
increments. Check alignment at each stop by
making sure blower driveshaft (24) can be
moved in and out without binding.
(20)
Tighten four screws (36) to 40 to 45 lb-ft
(54 to 61 N.m).
(21)
Tighten six screws (44) to 20 lb-ft (27 N.m)
and then tighten in equal five lb-ft
increments until tightened
30 to 35 lb-ft (41 to 47 N.m).
(22)
Blower driveshaft (24) should move freely.
If not, loosen screws (36) and (44) and
repeat Steps (18) through (21).
|