|
| |
TM 9-2320-364-34-2
7-4
Materials/Parts
Rags, Wiping (Item 47, Appendix B)
Sealing Compound (Item 53, Appendix B)
Gasket (Item 60, Appendix E)
Gasket (Item 62, Appendix E)
Screw (23) (Item 523, Appendix E)
This task covers:
a. Removal
b. Installation
c. Follow-On Maintenance
INITIAL SETUP
Equipment Condition
Engine OFF, (TM 9-2320-364-10)
Wheels chocked, (TM 9-2320-364-10)
Driveshaft disconnected from front of Axle No. 2,
(TM 9-2320-364-20)
Tools and Special Tools
Tool Kit, General Mechanic’s
(Item 240, Appendix F)
Pan, Drain 4 gal (Item 144, Appendix F)
Wrench, Combination 1-1/16 in.
(Item 254, Appendix F)
Wrench Set, Socket 3/8 in. Drive
(Item 273, Appendix F)
Wrench, Torque (0-60 N.m)
(Item 276, Appendix F)
Wrench, Torque (0-175 lb-ft [0-237 N.m])
(Item 277, Appendix F)
7-3. TRANSMISSION OIL PAN AND GASKET REPLACEMENT.
a.
Removal.
Do not drain transmission fluid while transmission is hot. Injury to personnel may result.
Fuel and oil are slippery and can cause falls. To avoid injury, wipe up spilled fuel or oil
with rags.
NOTE
Center drain plug and gasket should not be
drain plug and gasket.
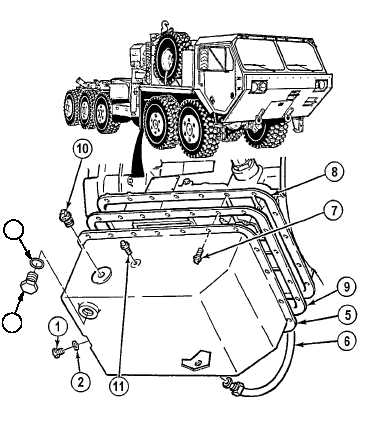
(1)
Place drain pan under work area and remove
plug (1) and gasket (2) or drain plug (3) and
gasket (4) from transmission oil pan (5) and
drain oil. Discard gasket if removed.
(2)
Remove transmission dipstick tube (6) from
transmission oil pan (5).
Support oil pan while removing
screws or oil pan may fall and
damage may occur.
(3)
Remove 23 screws (7) and transmission oil
pan (5) from transmission (8). Discard
screws.
(4)
Remove and discard gasket (9).
(5)
Remove plug (10) and plug (11) from
transmission oil pan (5).
4
3
|

