|
| |
TM 9-2320-364-34-2
7-5
b.
Installation.
Adhesives, solvents, and sealing compounds can burn easily, can give off harmful vapors, and
are harmful to skin and clothing. To avoid injury or death, keep away from open fire and use
in well-ventilated area. If adhesive, solvent, or sealing compound gets on skin or clothing,
wash immediately with soap and water.
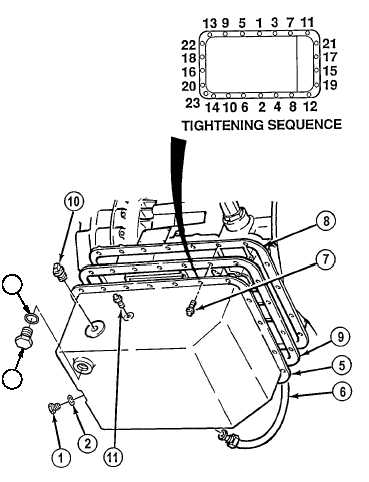
(1)
Apply sealing compound to threads of
plug (11).
(2)
Install plug (11) in transmission oil pan (5).
Tighten plug to 120 to 144 lb-in (14 to 16
N.m).
(3)
Apply sealing compound to threads of
plug (10).
(4)
Install plug (10) in transmission oil pan (5).
Tighten plug to 75 to 80 lb-ft (102 to 108
N.m).
(5)
Align gasket (9) screw holes with screw holes
in transmission oil pan (5).
(6)
Install gasket (9), oil pan (5) and
23 screws (7) on transmission (8). Tighten
screws in sequence shown to 120 to 156 lb-in
(14 to 18 N.m).
(7)
Apply sealing compound to threads of
dipstick tube (6).
(8)
Position transmission dipstick tube (6) on
transmission oil pan (5).
(9)
Install gasket (4) and drain plug (3) or
gasket (2) and plug (1) in transmission oil
pan (5). Tighten plug 180 to 240 lb-in
(20-27 N.m).
c.
Follow-On Maintenance:
Install driveshaft on front of Axle No. 2, (TM 9-2320-364-20).
Fill transmission with oil, (TM 9-2320-364-20).
Start engine, (TM 9-2320-364-10).
Check transmission fluid level, (TM 9-2320-364-10).
Check for oil leaks, (TM 9-2320-364-10).
Shut OFF engine, (TM 9-2320-364-10).
Remove wheel chocks, (TM 9-2320-364-10).
END OF TASK
4
3
|

