|
| |
TM 9-2320-364-34-4
20-280
20-83. ENGINE OIL COOLER ASSEMBLY INSTALLATION (CONT).
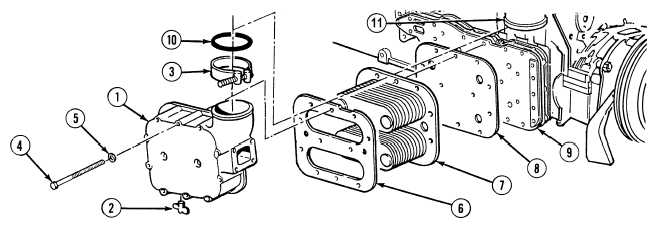
Inlet and outlet openings in oil cooler core are marked “IN” and “OUT”. Make sure oil cooler
is reinstalled in original position to prevent oil flow from being reversed.
(8)
Apply grease to two gaskets (6) and (8).
(9)
Install gasket (8), oil cooler core (7), gasket (6), seal (10) and hose clamp (3) on oil cooler housing (1).
(10)
Apply sealing compound to threads of 12 screws (4).
(11)
With the aid of an assistant, position oil cooler housing (1) and install with 12 lockwashers (5) and
screws (4). Tighten screws 120 to 180 lb-in (14 to 20 N.m).
(12)
Tighten hose clamp (3) on hose (11).
Adhesives, solvents, and sealing compounds can burn easily, can give off harmful vapors, and
are harmful to skin and clothing. To avoid injury or death, keep away from open fire and use
in a well-ventilated area. If adhesive, solvent, or sealing compound gets on skin or clothing,
wash immediately with soap and water.
(13)
Apply sealing compound to threads of draincock (2).
(14)
Install draincock (2) on oil cooler housing (1).
b.
Follow-On Maintenance:
Install engine oil filter and spin on adapter housing, (Para 20-84).
END OF TASK
|