|
| |
TM 9-2320-364-34-4
20-325
Materials/Parts - Continued
Gasket (2) (Item 82, Appendix E)
Lockwasher (5) (Item 285, Appendix E)
Lockwasher (Item 286, Appendix E)
Lockwasher (Item 288, Appendix E)
This task covers:
a. Installation
b. Follow-On Maintenance
INITIAL SETUP
Equipment Condition
Left thermostat housing installed, (Para 20-101)
Tools and Special Tools
Tool Kit, General Mechanic’s
(Item 240, Appendix F)
Wrench, Torque (0 to 175 lb-ft [0-237 N.m])
(Item 277, Appendix F)
20-102. ENGINE LIFTING BRACKETS INSTALLATION.
Materials/Parts
Primer “T” (Item 46, Appendix B)
Sealing Compound (Item 56, Appendix B)
a.
Installation.
NOTE
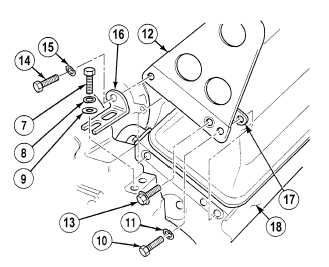
Right and left rear lifting brackets are installed the same way. Right side shown.
(1)
Install gasket (17), rear lifting bracket (12), bracket (16), lockwasher (15) and screw (14) on cylinder
head (18). Tighten screw to 35 to 38 lb-ft (47 to 51 N.m).
Adhesives, solvents, and sealing compounds can burn easily, can give off harmful vapors, and are
harmful to skin and clothing. To avoid injury or death, keep away from open fire and use
in well-ventilated area. If adhesive, solvent, or sealing compound gets on skin or clothing,
wash immediately with soap and water.
NOTE
Perform Steps (2) and (3) for left side only.
(2)
Coat threads of screw (13) with primer and
sealing compound.
(3)
Install screw (13). Tighten 23 to 26 lb-ft
(31 to 35 N.m).
(4)
Coat threads of screw (10) with primer and
sealing compound.
NOTE
Lockwasher in Step (5) is on
right side only.
(5)
Install lockwasher (11) and screw (10).
Tighten screws 41 to 47 lb-ft (56 to 64 N.m).
(6)
Coat threads of two screws (7) with primer
and sealing compound.
(7)
Install two washers (9), lockwashers (8) and
screws (7). Tighten screws 35 to 38 lb-ft
(47 to 51 N.m).
|