|
| |
TM 9-2320-364-34-4
23-28
23-9. CONTROL VALVE ASSEMBLY REPAIR (CONT).
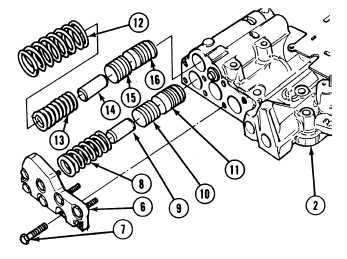
(4)
Position control valve body (2) flat side
down on clean work surface.
Cover is under spring pressure.
Wear proper eye protection to
avoid personal injury.
(5)
Hold trimmer cover (6) against spring
pressure and remove eight screws (7) and
cover (6) from control valve body (2).
Discard screws.
(6)
Remove spring (8), valve stop (9), plug (10)
and fourth clutch trimmer valve (11) from
control valve body (2). Discard spring.
(7)
Remove spring (12), spring (13), valve
stop (14), plug (15) and second clutch
trimmer valve (16) from control valve
body (2). Discard springs.
(8)
Remove spring (17), valve stop (18),
plug (19) and third clutch trimmer valve (20)
from control valve body (2). Discard spring.
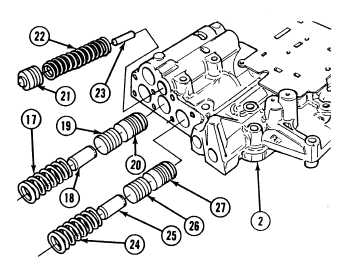
(9)
Remove trimmer accumulator valve (21),
spring (22) and valve stop (23) from control
valve body (2). Discard spring.
(10)
Remove spring (24), valve stop (25),
plug (26) and fifth clutch trimmer valve (27)
from control valve body (2). Discard spring.
|